April 22, 2024 -Create Blog Posts to Help Others Learn

Most of us have used information from the internet to learn something or complete a task. This is your chance to share things you know with others by creating blog posts giving instructions and information about something you are interested in.image showing teens on computers
Requirements for your Blog Post

    Contents
  • Each post should have a narrow focus on a specific topic. For instance, if your blog is about fishing, one post could be about a fishing trip you took. You could include an image or two from that trip showing the fish you caught. A second post could provide information about the gear you use and have links to Amazon where your viewers can learn more about and purchase the recommended gear.
  • Provide at least one image to go with each blog post.
  • Provide interesting and useful information to others who may want to learn from you. This could include tips for avoiding difficulties or links to sources you found useful.
  • Search for blogs about things you are interested in for ideas.
  • For more information, see this blog about three key elements that make a blog successful.
    Formatting
  • Every post should have a TITLE and a DATE
  • Posts should be in Chronological (DATE) order with the most recent post at the top of the page.
  • Use heading tags to define sections within the post to make it easy to read and understand.
  • Use ordered lists when giving step-by-step instructions that must be completed in order.
  • Use unordered lists when giving instructions and steps where the order does not matter.
  • All text should be easy to read. Ensure the text is readable over backgrounds and displays with appropriate margins and padding around the text and mages.
  • Each blog post should be consistently formatted.  
April 4, 2024 - Trouble Putting Files on Remote Server?

When you click your name on the left, do you get a "forbidden error"? This is the server saying that there are no files to show you.  You need to transfer the files from your computer to the server using a process known as  File Transfer Protocol, or FTP. Read on for information to help you transfer your files.

Transfer Files to the iPage Server

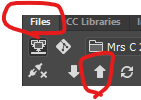
screenshot showing the Dreamweaver file panel and put icon
  1. Open the Dreamweaver Files panel, and select the HTML file or files you need to transfer.
  2. Click the upward pointing arrow at the top of the files panel. This icon icon is referred to as "Put".
  3. You will be asked if you want to place the dependent files. Dependent files are any files linked to or contained within the files you are transferring such as image files and CSS files. If you have changed to the CSS file or images, you should say YES. If you have not changed any of the dependent files say NO.

Check Your Site Filesscreenshot showing the refresh icon

  1. Click your name at the left to be taken to your site files.
  2. Hold the CTRL key, click the Refresh icon in the browser bar, or press F5. This will force the browser to download the files from the file server. If you do not force the refresh, the browser may pick up the old file from the cache on your computer and you will not see the changes you made.

April 1, 2024 - Adding Lorem Ipsum with Dreamweaver

Lorem Ipsum text is placeholder text that can be used to help you see what the format looks like. Dreamweaver will add lorem ipsum text for you.screenshot of lorem ipsum text

Steps to Add Lorem Ipsum Text

  1. Position your cursor within the paragraph tag in the code view
  2. Type loremxx (where XX is the number of words you want to generate)
  3. Press the tab key.

Lorem ipsumXX will be replaced with the correct number of words. If you use a funny online lorem ipsum generator, be sure to read the generated text carefully before placing it into your page!